
A proxy server is necessary for those who want to access prohibited or blocked resources on the Internet. The proxy server serves as a link between the user and the Internet, provides anonymity to the user. The proxy service does not use a direct connection, so your location and IP address will go unnoticed. If your ISP has restricted access to resources, a proxy server allows you to access them. Proxies are paid and support different types of protocols. Consider protocol compatibility and proxy server performance when selecting and configuring programs.
Proxifier is software that allows applications to run via a proxy server, including even applications that do not support the use of proxies. A proxy server, otherwise called a proxy server in French, is a remote server or machine that acts as an intermediary between your hardware (computer, smartphone or tablet) and the Internet. As a result, your connection is secure and you browse anonymously, because your IP address will not be published.
Everyone knows that a proxy is necessary for anyone who wants to travel safely on the Internet while maintaining anonymity. Proxifier a great way to protect all the important data on your computer from the “paws of scammers.” Today here is a discussion about how to also, you can configure proxy through Proxifier and make it function quickly and efficiently.
Step-by-step instruction:
To add a new IP to the Proxifier program, first download it from the search engine.
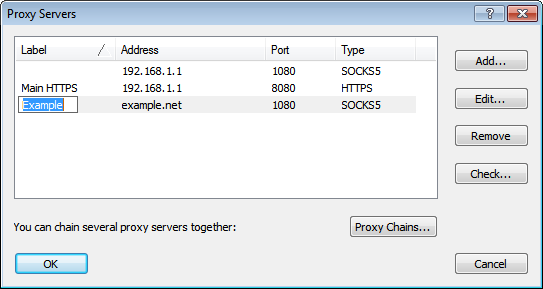
Launch and select Profile> Proxy Servers> Add> …
Enter the IP and Port, enter the Protocol type and write the login with a password.
If authorization is necessary, click the “Enable” checkbox, specify login and password.
After a few seconds, Proxy testing starts and the utility goes by default to the google.com web portal (you can write another site if you wish).
Then one of two answers should appear: if the port is not functioning or the test remains in standby mode, then you will see the message “Testing Failed”, and “Completed Successfully” will mean successful completion.
Then click OK and minimize all the windows.
Proxy Setting
In this case, the proxy is configured using the socks5 protocol and authorization by login and password:
To configure a separate browser in Proxifier, for example Opera, you need to select Profile-Proxification Rules:
In the window that opens, click Add. Fill in the fields as in the screenshot, in the Application field specify the names of the application launch file:
Click OK, closing all windows. Now Opera is launched, for example, to the site, and you can see the IP address of the proxy:
If you configured everything correctly, then only the connections to the browser for which you configured the proxy will be displayed in the connection log:
This completes the configuration of the socks5 proxy through proxyfier.
Proxifier will help to ensure the secrecy of your information, send and receive e-mail through a proxy server, or a chain of proxy servers. All email clients are supported (Outlook, Eudora, Netscape and others).